
In this article we will setup your MacOS Terminal app so that you can use Git commands within the your Terminal app to sync with your desired remote repository, be it Github or Gitlab.
At this time of writing, I’m teaching a data analytics bootcamp course in Arizona State University (ASU), and some of my students are running on Windows using Git bash. Until I create another article or tutorial on how to sync your local machine with a remote Git repo, see if you can follow some of the steps here as some of you would’ve Git bash installed in your PC.
Before you begin, ensure that you have the following items:
- A Git repository that you can clone
Generate a new SSH key (If you haven’t)
Open Terminal from your Spotlight Search by doing one of the following:
- Click the Spotlight icon in the menu bar
- Press
Command-Spacebar
In the search field, type “Terminal” and select the Terminal.app. You should see a prompt that is similar to mine:

First, to ensure that you’re in the home directory, type cd ~ in the Terminal and hit Enter. By default, this should ensure that you’re in the home directory.
Next, type ls -ali | grep ssh to see if a .ssh folder exist:

ls -aliis to list all files and folders, including hidden files. All hidden files start with a dot notation.*in Unix and Linux systems.grep sshis to filter all entries that contain the “ssh” string. You can do without and usels -aliinstead.- If you do not see a
.sshfolder, then create one by typingmkdir .sshand hit Enter. - If you see a
.sshfolder, then do nothing.
Go into your .ssh folder by typing cd ~/.ssh and hit Enter.
From this folder, we can generate a new SSH key by simply typing this command:ssh-keygen -t ed25519 -C "your_email@example.com"
- This will create an
ed25519key- I will not explain the different types of keys as it is out of scope from what we are trying to do. For now, let’s use the
ed25519key.
- I will not explain the different types of keys as it is out of scope from what we are trying to do. For now, let’s use the
- Put in your email address so that you can easily identify your key.
- When you’re prompted to “Enter a file in which to save the key”, you can press Enter to accept the default file location. You’re already in the appropriate folder since you’re in
~/.ssh.- Feel free to change the file name to something that make sense. Typically, the format is
id_<your_desired_name>
- Feel free to change the file name to something that make sense. Typically, the format is
- It will prompt you to create a passphrase. For the sake of simplicity, we will just leave it as-is and hit Enter. However, it is good practice to include a passphrase.

You should have 2 files within your folder:
- An
id_<whatever name you chose>that is your private key.- Never ever expose this key to any one, including flash drives! This is the secret key that identifies your machine (or you figuratively).
- Another file that has the
.pubsuffix is the public key.- This is the file that you can share with others. You will need this because this works as a pair with your private key.

To ensure that there will be security warnings, change the permissions of your files by typing: chmod -R 600 ~/.ssh/*
- This changes the permissions of the file to only be accessible to your user. Sometimes, your machine detects that your files are not properly secured, and they require you to do this before you can use your private keys.
From here, you’re ready to register your public key to your Git remote repository.
Registering your SSH public key in your Github/Gitlab profile
Log in to your Github/Gitlab account.
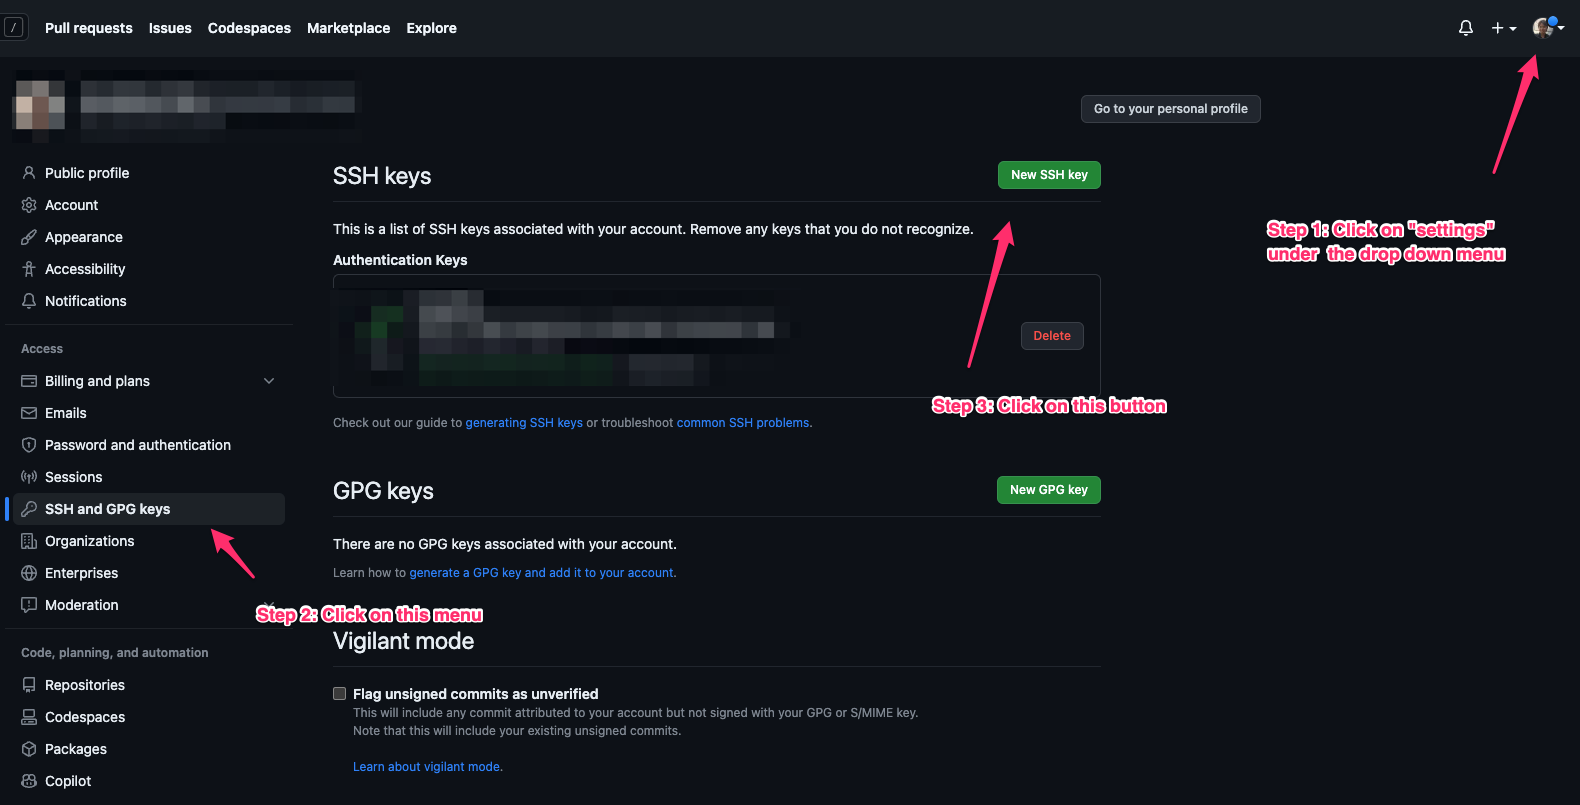
Follow the screenshot above where you find the “SSH and GPG keys” section of your settings, and then click on “New SSH key”.
You should be seeing something like this:

Go back to your Terminal and in your ~/.ssh folder, and type cat id_<whatever name you chose>.pub here. Remember, it is the public file with the .pub suffix!

Select and copy the above string inclusive of your email, leaving no spaces after your email address. An empty space can generate an error here.
Paste the public key into the Github/Gitlab profile here, and then click on the “Add SSH key” button:

If you have turned on 2-factor authentication for your Github, they will prompt you to authenticate here.
You should see something like this after you hit the “Add SSH key” button:

Your Github profile is setup with your SSH key, and there is one last remaining step!
Setup your Terminal to automatically sync with your SSH key for Github
Go back to your ~/.ssh folder and create a config file that has the following text here:

- I typically use
vim configornano configto write a new file with the above settings. - Or you can use a text file editor, put the above configuration, and save it under your
~/.sshfolder.
This configuration will do the following:
- Whenever you’re cloning a repository from Github or Gitlab, as it has the
github.comhost, it will apply the usergitand your private key to the configuration. - We have copied your public SSH key into your Github/Gitlab profile. Thus, the system is smart enough to identify this is your machine, and give you the access to your repositories.

The above is where you fine the address to clone from. It will look something like this:git@github.com:<your name space>/<your git repo>.git
Go to a folder and clone your repository in your Terminal to try it out. Example code here:git clone git@github.com:<your name space>/<your git repo>.git
It will create a folder based on your repository name, and you’re all set to use Git commands on the command line to sync with your Git repository!

![Preparing Your AWS CDK Framework IN Typescript [VIDEO]](https://gefyra.co/wp-content/themes/Extra/images/post-format-thumb-video.svg)